Restrict PostgreSQL Remote Access to your Tailnet

I'm a convert to Tailscale. The user experience is fantastic and having all of my devices and servers protected by a Wireguard virtual network gives me peace of mind.

I'm progressively locking down all of my servers and services to only talk over my Tailscale network. Here's how I have done it for PostgreSQL. As with any configuration to something as important as a database please make sure you've read and understood the relevant documentation before taking the word of a random person on the internet.

First, the machine that your PostgreSQL database is running on needs to be connected to your Tailscale network - usually called your 'tailnet'.

To allow access to your PostgreSQL database from other machines on the same tailnet you need to amend 2 configuration files; postgresql.conf and pg_hba.conf.

In postgresql.conf you define which network interfaces the server will listen on, the recommendation here is to allow the server to listen on every interface the server has defined by adding a line that looks like this;

listen_addresses = '*'

It may be possible to further lock down our server by restricting this to just the Tailscale network interface, but I haven't figured out how to do that yet.

The second part is to allow remote access via the tailnet in pga_hba.conf. This is done by adding a line to the bottom of that file that looks like this;

# TYPE  DATABASE    USER    ADDRESS     METHOD
host    all         all     10.64.0.0/10       md5

This will allow connection to any local database by any user as long as they come from a Tailscale IP address. 10.64.0.0/10 specifies the set of IP addresses that Tailscale uses. For details of the IP range that Tailscale uses check out their FAQ.

The final step is to restart your PostgreSQL server. Once this is done any client device connected to the same tailnet will be able to access your PostgreSQL database.

TIL - Python ArgParse Run One Function

I’m building a command line executable in Python. It’s going to be a single script that has multiple functions, one to extract some data to a SQLite database, and another to run a query against that database using aiosql. The pattern I want to follow here is that the first argument to the script describes the operation to carry out and then following that are arguments to that operation. I’ve implemented this pattern in Python using the argparse library as follows;

import argparse
parser = argparse.Argument_Parser("run a single function")
parser.add_argument("operation", choices=["extract", "query"], help="The operation to run")
parser.add_argument("params", nargs="*", help="Arguments to send to the operation")
args = parser.parse_args()
if args.operation == "extract":
    # extract data and put it in our database
    run_extract()
elif args.operation == "query":
    # run the named query with provided parameters
    run_query(args.params)

With inspiration from this StackExchange post - https://stackoverflow.com/questions/59314792/how-to-run-different-python-functions-from-command-line

The use is quite straight forward. With the code above in a Python script called dump_query.py and given a series of named queries in an associated file I can do

$ python dump_query.py extract
122 lines written to database
$ python dump_query.py query invoices_this_month
38 lines written to invoices_this_month.csv
$ python dump_query.py query payee_invoices 'Grace Brothers'
44 lines written to payee_invoices.csv

Jinja2 Templates in Django

Django supports 2 different template languages out of the box; Django Template Language (DTL) and Jinja2. The project documentation and most 3rd party tutorials deal exclusively with DTL. There is information on using Jinja2 templates in Django but it is scattered and a bit inconsistent.

This is my attempt to provide a simple introduction to using Jinja2 templates in your Django project. To improve the reach of this document I'll restrict the examples to only use the sample Django project from the official tutorial and to make sure that I use the same terminology as that series of articles.

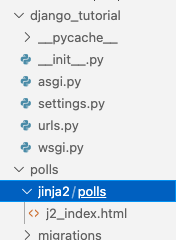
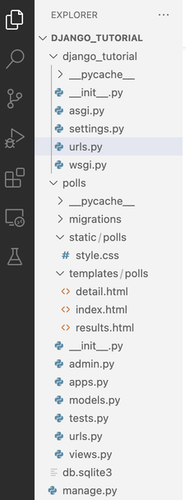
If you've worked your way through the tutorial and have a working copy of the final code you should have a directory structure that looks like this;

Project folders 1

Enabling Jinja2 templates for the polls application is a 3 step process;

Enable Jinja2 Templates

Add an entry to the TEMPLATES entry in the project settings.py file. This will enable the Jinja2 template parser for your whole project. It should look like this;

TEMPLATES = [  
    {  
        'BACKEND': 'django.template.backends.jinja2.Jinja2',  
        'DIRS': [  
        ],  
        'APP_DIRS': True,  
        'OPTIONS': {  
            "environment": "polls.jinja2.environment",  
        },  
    },
...

Don't remove the section that refers to the DjangoTemplates backend as this will be needed by other applications in your project, particularly the admin application.

Set up Your Jinja2 Environment

Create a jinja2.py file under django_tutorial/polls. This controls which global functions are available to your Jinja2 templates. A simple version will look like this

from jinja2 import Environment  
from django.urls import reverse  
from django.templatetags.static import static


def environment(**options):  
    env = Environment(**options)  
    env.globals.update({  
        "static": static,  
        "url": reverse  
    })  
    return env
Create a Folder for your Jinja2 Templates

By default (and because we set APP_DIRS to True in the Jinja2 template configuration in our settings.py) at run time Django will chose which template backend to use based on the name of the directory any template file is located in. The default for Jinja2 templates is <app name>/jinja2/<app name>. So for our polls application we need a folder called django_tutorial/polls/jinja2/polls.

Project folders 2

Be careful when mixing and matching Jinja2 and Django templates in your own applications though. As a general rule it's better to use one template backend for all of the pages in your application. If you do mix and match make sure that you give each template a distinct name, if only to avoid confusing yourself when you are working on your project.

Note that you can specify your own location for Jinja2 (and Django) templates on a project or application basis but that's beyond the scope of this article.

Back to Blogging

I haven't stopped, I've just stopped writing here. So now it's time to attempt a comeback, and not to be too hard on myself if this is a once in a while proposition. I haven't been working on a big secret project, or at least nothing that will be ready to reveal for a decade or two. Most of my technology and free time has been spent on what I would call 'tinkering'. I have tried out a lot of tools, technologies and small experiments but nothing has stuck.

So rather than wait for something serious and significant to write about I'm going to try and keep track of the things I have been trying in the hope that they will help other people in similar situations or act as a deterrent from wasting your time on such frivolous pursuits.

To that end I'm going to attempt to keep some weeknotes here, inspired by but probably not nearly as useful as those published by the likes of Simon Willison and Dan Catt.

For reference the subjects I've spent most time fiddling about with are Markdown note taking tools, various Python libraries, and trying to run my own services on my own server very much in the vein of Danny O'Brien's living on the edge discussions from a mere 12 years ago. Who says I'm not up to date?

DNS Configuration

This post answers the question "how do I host my email at one provider and my web site at another?". In particular it shows how to set up DNS at your domain name registrar, email at Fastmail and web hosting at WebFaction.

Most of the how to DNS configuration guides on the web show how to point to a single hosting provider for web, email and other services. I'm awkward and wanted to separate my email from web hosting. So by a little trial and error I came up with this set up for my personal domain.

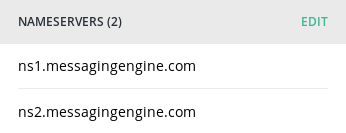
First at your domain registrar (I use hover) set the domain namervers to Fastmail, I've used 2 of their name servers.

Nameservers

This delegates control of all DNS activity for the domain to Fastmail. Without any other changes this will allow Fastmail to manage email and serve a limited web site from their hosting option. I choose to host my web site at WebFaction and so to delegate this from Fastmail we use their domain configuration dashboard and set up DNS 'A' records to point to my WebFaction host.

A records

The final step is to configure WebFaction to accept and serve your domain. If they don't recognise incoming web traffic you won't be able to server a web site on your domain. Here's mine set up in domains section of the WebFaction control panel.

Control panel

RSS Readers in 2016

After the great Google Reader shutdown of 2013 I switched my feed reading to a self-hosted instance of Fever and I've been a happy user ever since. I didn't mind that it wasn't open source, I was glad to spend the money to support a developer building a great product. Sadly now that support and developed has ended. I'd like to thank Shaun Inman for a great product. The end of development and support for Fever don't necessarily mean that it will stop working at any time in the near future. But I took this as an opportunity to look around at the state of the RSS reader world and see if there isn't a better tool for me to use now and for the future.

My requirements are simple. It must run on a server that I control, be accessible using a reasonably modern web browser and support import and export of feed listings via OPML. Theere are bonus marks if the Fever API is supported (I've got Reeder running on my iPad) and for ease of installation and use. I'm not a sophisticated feed reader but I've accumulated quite a collection of sites that I follow over the years. Fever is currently following 370 feeds but I can use any transition as an opportunity to trim away the dead wood.

After a little research and with some help from OpenSource.com I narrowed my search to three possible solutions: selfoss, miniflux and Tiny Tiny RSS

My evaluation strategy was pretty simple - install the tool on an Ubuntu virtual machine and if it looks promising do a fresh install on my web server and try the tool for size for a few days.

Selfoss

This topped a few of the searches I did and was the first solution I installed. Well, I say that but I haven't managed to install it on my VM. I got to the stage of posting to the forum asking about error messages that reported missing PHP .so files before I gave up. In this particular case it looks to me like the install expected PHP 5 but on the Ubuntu 16.04 the default is PHP 7. I may be wrong, I'm certainly no PHP guru, but clear installation requirements and instructions are nice. I may revisit selfoss again and see if I can't get over my installation problems.

Miniflux

Miniflux takes the river of news approach and applies it to a minimalist presentation. Installation was fairly straight forward and I managed to import my feed collection quite quickly. The folder structure that I had set up in Fever didn't make the transition - it isn't part of the OPML contents - so I took the opportunity to trim my feed list and put them into a small number of groups.

Updating the feeds is simple in the web UI - just press the 'refresh all' link on the subscriptions page. Then go to the 'unread' page and scroll through the articles. There are some nice simple keyboard shortcuts to aid navigation and reading.

There are 2 puzzles I still haven't cracked with Miniflux. I can't get the automated feed refresh working - probably something to do with the way I have set up PHP - and I still haven't found out what the 'groups' are used for. Apart from this minor quirks I am liking the philosophy and execution of miniflux and I think it's going to be my feed reader from now on.

Tiny Tiny RSS

Tiny Tiny RSS has been around for a few years and receives rave reviews on the web. Installation on my virtual machine was pretty straight forward and I had it up and running without any problems. The interface is more complex than Miniflux, and even than Fever, with nested folders of feeds and a nice display of each article.

Where I struggled with Tiny Tiny RSS was refreshing the feeds. The documentation says that this is best done via a cron job but I couldn't get the command working. I'm also not mad keen on running a PostgreSQL server on my web host as I'm not knowledgeable enough to keep it running securely.

So for the time being I'm going with Miniflux
Simple Log

I found myself putting the same few lines of code at the top of every script or module that I wrote. It went something like this:

import logging
MESSAGE_FORMAT = "%(asctime)s %(levelname)s:: %(message)s"
DATE_FORMAT="%Y.%m.%d %T"
logger = logging.getLogger(self.__name__)
logger.setLevel(logging.INFO)
formatter = logging.Formatter(MESSAGE_FORMAT, DATE_FORMAT)
ch = logging.StreamHandler()
ch.setFormatter(formatter)
logger.addHandler(ch)

Because the default simple logging provided by the standard library logging package doesn't do everything I'd like. I prefer that messages contain the time that they were generated. I prefer that the default logging level is set to INFO. I don't really care to see the log name in each log message.

When I built bigger applications I found myself putting this code in a log.py file and including it with the application source code. Then I wanted to change the log format. Which meant editing quite a few copies of the same file. So I decided that was a bad idea and I would turn my simple few lines of code into a Python module and publish it on PyPi. That way I could include a single copy of the code in each of my modules or applications with a simple pip install command.

The last time I did some serious packaging work this all rather tricky but thanks to the most excellent work of the Python Packaging Authority publishing your own Python module is a breeze these days.

So say hello to simple_log. It's available from PyPI now - https://pypi.python.org/pypi/simple-log/

The documentation is on this site - http://halfcooked.com/code/simple_log/ and the source code lives on BitBucket at https://bitbucket.org/andy47/simplelog

It's designed to be a simple log module that can be incorporated in any Python application and used as simply as:

>>> from simple_log import get_log
>>> log = get_log()
>>> log.info('Information message')
2016.12.12 13:30:30 INFO:: Information message

No more worrying about streams and formatters just a nice simple way to get a log object and log messages from your code. The code is licensed under the MIT license so corrections, additions and praise are always welcome.

Generating Diceware Passwords in Python

Today I'm going back to a theme from a post I wrote last year and looking at generating passwords with my favourite programming language. A tweet from Simon Brunning pointed me to Micah Lee's article at The Intercept and my first thought was to write a function to do this in Python. So here it is;

import random
word_dict = {}
passphrase = []
with open('diceware.wordlist.andy.txt') as f:
    for line in f.readlines():
        index, word = line.strip().split('\t')
        word_dict[int(index)] = word

for words in range(0, word_count):
    this_index = 0
    for position in range(0, 5):
        digit = random.randint(1, 6)
        this_index += digit * pow(10, position)
    passphrase.append(word_dict[this_index])
return ' '.join(passphrase)

In terribly bad form I've hard coded the diceware word list file name. I took the English word list and converted it to a plain text file for easier processing. The original will probably work just as well, I just haven't tested it.

Teaching an old dog to Fish

Inspired by the recent furore around Shellshock I decided that it was time to try an alternative to bash By the very grown up process of shutting my eyes and poking my finger at the results of a search for "shell" I ended up at fish shell, described by the project as "a command line shell for the 90s". I'm presuming that this means the 1990s and is not a minimum age requirement.

I'm quite enjoying it so far but the missing piece for me was something equivalent to the very useful virtualenvwrapper. Luckily for me someone else has already had this problem and wrote virtual fish. For which many thanks. I did have a little trouble with installation and configuration. I'm sure that this was entirely my own fault but as a reminder for me and anyone else who stumbles on this here is what I did.

  • Downloaded virtual.fish from the Github repo to ~/bin
  • Because I don't use ~/.virtualenvs to store my virtual environments I added set -x VIRTUALFISH_HOME ~/Work/envs/ to my .config/fish/fish.config file
  • Included the currently active virtual environment name in my prompt by following the instructions. A trap for young players is to make sure that you do funcsave fish_prompt as instructed. I missed this out the first couple of times and kept wondering why my prompt was wrong.

Update: Thanks for the comments. bronsen - yes I do source virtual.fish in my config.fish. Or at least I did until jl pointed me at Pew. Now I've switched to that from virtualenvwrapper and virtual.fish and I must say that it works like a dream. Thanks both for taking the time to leave a comment.

Generating Reasonable Passwords with Python

Thanks to a certain recent Open SSL bug there's been a lot of attention paid to passwords in the media. I've been using KeePassX to manage my passwords for the last few years so it's easy for me to find accounts that I should update. It's also a good opportunity to use passwords that are stronger than words such as 'banana'.

My problem is that I have always resisted the generation function in KeePassX because the resulting strings are very hard to remember and transcribe. This isn't an issue if you always use one machine but I tend to chop and change and don't always have my password database on the machine I'm using. I usually have a copy on my phone but successfully typing 'Gh46^f27EEGR1p{' is a hit and miss affair for me. So I prefer passwords that are long but easy to remember, not unlike the advice from XKCD.

Which leaves a problem. Given that I now have to change quite a lot of passwords how can I create suitably random passwords that aren't too difficult to remember or transcribe? Quite coincidentally I read an article titled Using Vim as a passowrd manager. The advice within it is quite sound and at the bottom there is a Python function to generate a password from word lists (in this case the system dictionary). This does a nice job with the caveat that as I understand it from a cryptographic standpoint the passwords it creates are not that strong. But useful enough for sites which aren't my bank or primary email. For those I'm using stupidly long values generated from KeePassX. When I tried the Python function on my machine there was one drawback, it doesn't work in Python 3. This is because the use of 'map' is discouraged in Python 3. But that's alright because I can replace it with one of my favourite Python constructs - the list comprehension. Here is an updated version of invert's function that works in Python 3. Use at your own risk.

def get_password():
    import random
    # Make a list of all of the words in our system dictionary
    f = open('/usr/share/dict/words')
    words = [x.strip() for x in f.readlines()]
    # Pick 2 random words from the list
    password = '-'.join(random.choice(words) for i in range(2)).capitalize()
    # Remove any apostrophes
    password = password.replace("'", "")
    # Add a random number to the end of our password
    password += str(random.randint(1, 9999))
    return password